Universally Misunderstood : Programmatically Installing Universal Print Printers

In today’s world of print nightmare vulnerabilities and security exploits around printing and driver installation, our organization was looking into various ways to mitigate our risk while still allowing our non-admin users to install printers on their computers. After looking at all the options out there, Microsoft’s Universal Print solution seemed like a perfect option. It uses a preinstalled universal printing driver that is native to the OS, and it gets updates through Windows updates. We found there is even support for job-holding and follow me printing through third party addons like the Papercut Universal Print connector, which is free with our existing Papercut subscription.

The big issue with Universal Print is the lack of documentation when it comes to doing things like programmatically installing printers. As an admin who likes having control over all things, I was a bit miffed that I couldn’t find a way to install a Universal Print printer via C#, Powershell or any of the other tools at my disposal. This means that I can neither “push” a printer to a user’s machine, nor build an application to allow them to easily do the job themselves. Microsoft’s only existing solution at the time of writing this article is a convoluted system of csv files, and an .intunewin packaged installer delivered through Intune that will perform a printer installation during a user log on event. There’s a certain inelegance to that method of installation, that I just can’t accept in my life.

Traditional Printing Solution

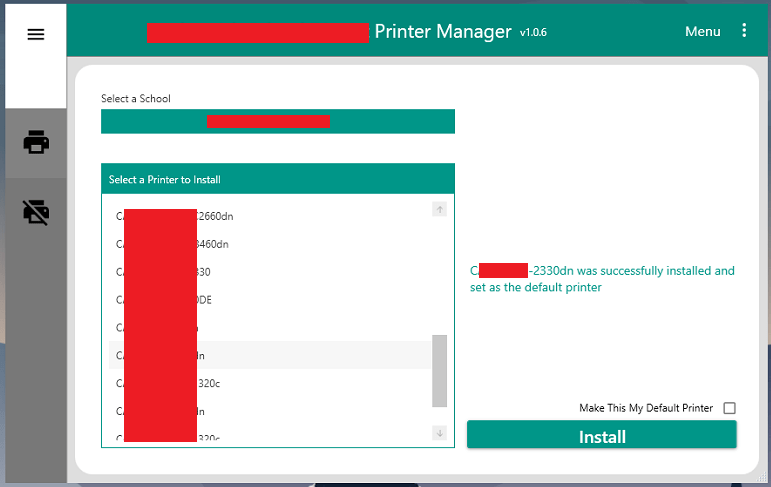
Currently, users in our organization use a printer management tool I wrote that allows them to select the location they’re at, then pick a printer from a list of printers at that site. A list box is then populated with the list of printers dedicated to that site by querying the print server for that location. They can then install the printer while choosing whether or not to make it their default printer. The app also handles uninstalling printers as well.

There’s got to be a better way!

I wanted our users to manage printers the same way after we migrated to Universal Print. Traditional printer installation, aka connecting to a shared network print queue, is a well documented .net procedure that was easy to implement. Unfortunately, the same could not be said for Universal Print printer installation. I decided to take the Hail Mary long shot and go hat-in-hand to Microsoft asking for their help. I fully expected them to come back to me with a simple and concise, “No, but thank you for your interest”. Luckily I connected with a very helpful support escalation engineer who did their best to squeeze any nugget of information out of the Universal Print dev team who were, as I expected, reluctant to divulge any useful information. My useful nugget came in the form of three simple word. Windows, devices, enumeration. Knowing that this was as much help as I would receive, I took it and said, “thank you very much”.

Narrowing the scope of my search was all I needed, so I set off and read everything I could about that particular namespace. As it turns out, Universal printers are not truly installed at all. They are paired using the functionality of the Windows.Devices.Enumeration namespace. This is very similar to the process of pairing a Bluetooth device, a WSD device, UPnP device or any other wireless device. After brushing up on all of the related Microsoft documentation I found that Microsoft has a sample pairing application (download this if you’d like to follow along with the code below) written in my preferred language, C#, that was already to set up to pair the most common types of devices. This really helped my understanding of the discovery, and the pairing process. This was also perfect because I now had a basic platform to perform my testing that wouldn’t require me to code it from scratch. I just had to figure out how to actually do the pairing.

On a scale of 1 to 10

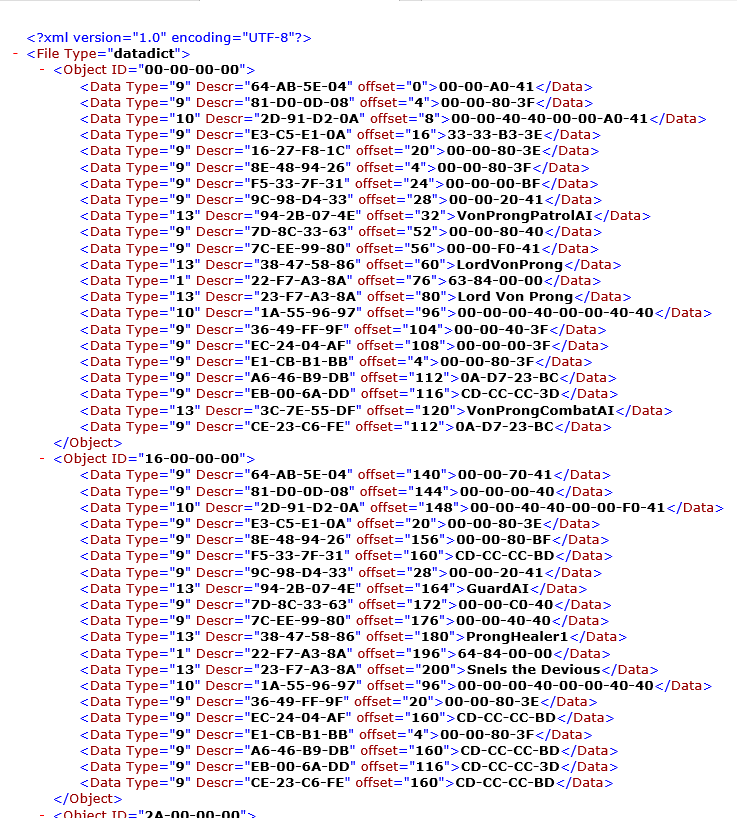
I’ll skip over all the days of investigation work I did and get right to the code that worked, and what modifications you can make to Microsoft’s sample pairing application to test the functionality for yourself. I’ll be using the C# version of the sample pairing application if you’re following along. This code supports “scenario 8”, simple device pairing. First, in the DisplayHelper class, I had to create a new DeviceSelectorInfo object. This binds an aqs query string as well as a DeviceInformationKind object to the selectable dropdown box which determines the types of devices which will be searched for. The short explanation of the query is that “~<” is the “begins with” operator. The query runs a search for any AssociationEndpoint with an ID starting with “MCP#”.

 
//a new DeviceSelectorInfo object for Universal Printers
public static DeviceSelectorInfo UPprinter =>
            new DeviceSelectorInfo() { DisplayName = "Universal Print Printer", Selector = "System.Devices.Aep.AepId:~<\"MCP#\"", Kind = DeviceInformationKind.AssociationEndpoint};

Next, the application populates the list of selectable items rather than doing so through direct binding because it uses different DeviceSelectorInfo objects for different scenarios. Because of this, you’ll need to populate the dropdown selector with the newly created DeviceSelctorInfo object. Scroll down in the DisplayHelper class to the public static List named PairingSelectors and add “selectors.Add(UPprinter);”

 /// <summary>
        /// Selectors for use in the pairing scenarios
        /// </summary>
        public static List<DeviceSelectorInfo> PairingSelectors
        {
            get
            {
                // Add selectors that can be used in pairing scenarios
                List<DeviceSelectorInfo> selectors = new List<DeviceSelectorInfo>();
                selectors.Add(Bluetooth);
                selectors.Add(BluetoothLE);
                selectors.Add(WiFiDirect);
                selectors.Add(PointOfServicePrinter);
                AddVideoCastingIfSupported(selectors);
                selectors.Add(Wsd);
                selectors.Add(Upnp);
                selectors.Add(NetworkCamera);

                //New Universal Print Selector
                selectors.Add(UPprinter);
                

                return selectors;
            }
        }

The first time I ran the search and I found a bunch of Universal Print printers, I was ecstatic. By placing a few breakpoints in the Watcher_DeviceAdded method of the DeviceWatcherHelper class I could view the DeviceInformation objects that were returned from the query. They contained a device id, and pairing properties to show if the device was able to be paired and if it was paired already. I rushed out to update my printer manager application to support searching for and pairing with Universal Print printers.

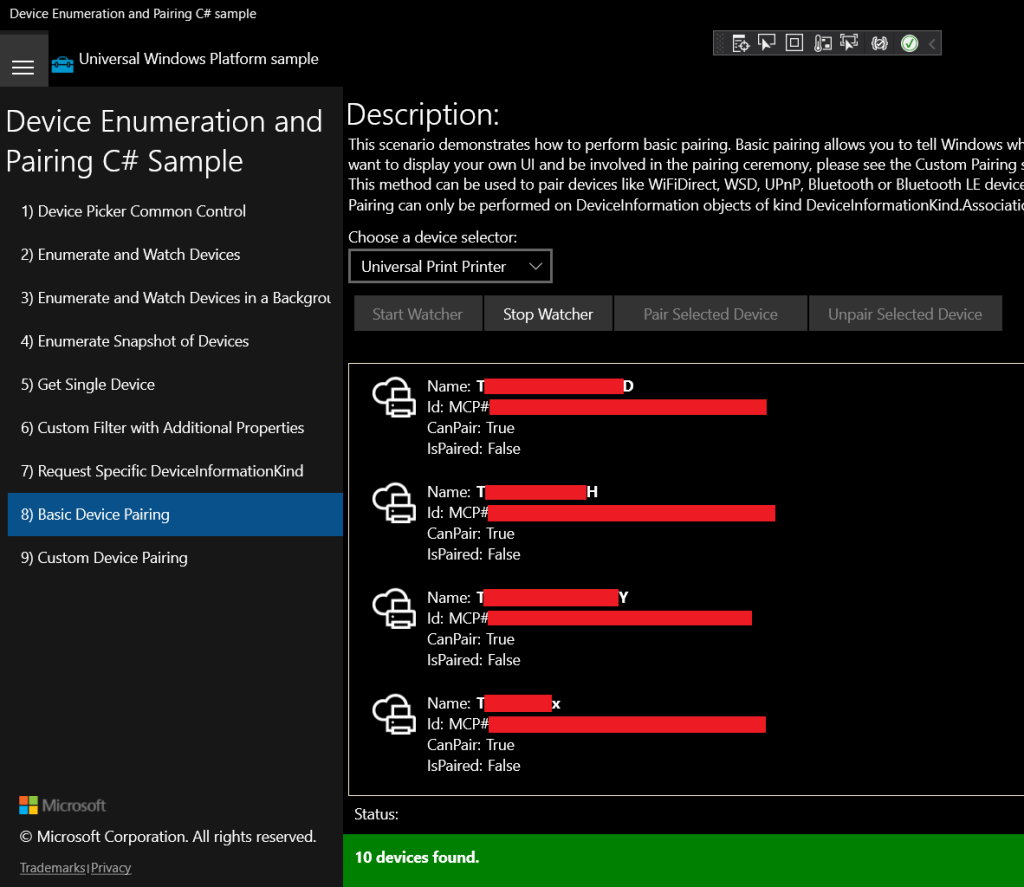
Quickly though, my hopes were dashed when I made an upsetting realization. I had provisioned close to 30 UP printers, but only 10 of them were being found. I spent several days probing for mistakes in the code, and trying various aqs queries. I tried enumerating UP printers via their AssociationEndpointContainer parents, and other various fruitless methods. No matter what I did, my code would only ever find 10 devices. Eventually I found my answer in a support article from Microsoft.

“If the printer is still not in the list of discovered printers, that could be caused by the fact that Windows shows the first 10 printers discovered from Universal Print in the order of their proximity to the user.”

To borrow a phrase from a coworker of mine, “Soul crusher…”. This behavior, for whatever reason, is completely by design.

Where there’s a will

Having used Universal Print in my testing for a few months, I knew that Windows was perfectly capable of enumerating more than 10 printers at a time. The initial search will always return 10 results, but you can click “Search Universal Print for printers” and find the complete list. After some trial and error, I believe I know how they’re doing this. I think the extended list of printers that is returned in the Devices and Printers area of Windows is actually constructed by querying the Graph API. The relevant endpoint here is https://graph.microsoft.com/v1.0/print/shares. A GET request to this endpoint will return a list of all the shares a user has permissions to connect to. This was useful for seeing all the printers I could connect to, but it wasn’t enough on its own to help me install printers that weren’t in the list of 10 devices returned to me by the DeviceWatcher in the sample application.

When I queried the printer shares I noticed something interesting. The ID of each printer share looked suspiciously like the IDs of the AssociationEndpoint DeviceInformation objects that were returned by the application’s DeviceWatcher. If my UP printer share’s ID through the Graph API was 00000000-0000-0000-0000-000000000000, the AssociationEndpoint DeviceInformation object’s ID would be MCP#00000000-0000-0000-0000-000000000000. Basically, every pairing object’s id was simply it’s Graph API ID with the prefix “MCP#”.

From here it just took a little more research to find that I could directly query and single UP printer whether or not it was in the list of 10 devices returned to me by the DeviceWatcher. In fact, the method doesn’t use a DeviceWatcher query at all. Instead it uses the DeviceInformation.CreateFromIdAsync() method of the Windows.Devices.Enumeration namespace to do the heavy lifting. I made a simple method that would take a passed in string in the form of a UP printer share id, create a Deviceinformation object from that id, and use that to pair the device.

/// <summary>
        /// Uses the ID of a UP printer share to pair the printer to Windows
        /// </summary>
        /// <param name="PrinterID"> ID of a printer share retrieved from the Graph API</param>
        private async void Pair_UPprinter_From_ID(string PrinterID)
        {
            //prepend MCP# to the string
            string AEPid = "MCP#" + PrinterID;
            //retrieve the Deviceinformation object from its ID
            var UPPrinter = await DeviceInformation.CreateFromIdAsync(AEPid);
            //perform the pairing operation
            DevicePairingResult Dpr = await UPPrinter.Pairing.PairAsync();
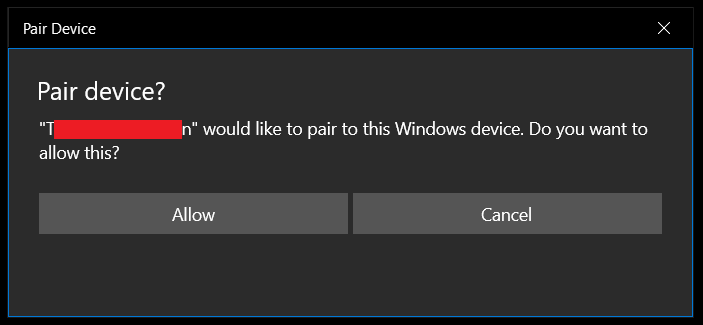
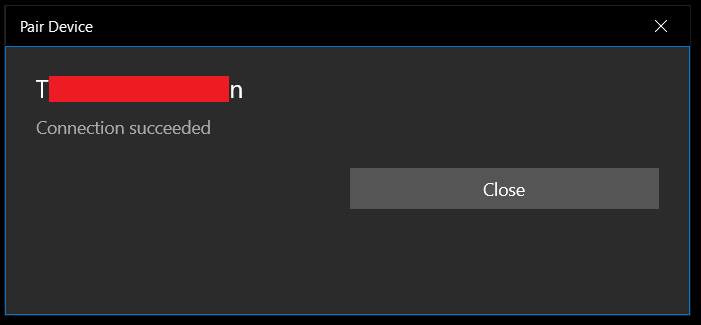
        }

When the Pairing.PairAsync() method gets called. The user gets a nice little Windows popup asking if they want to connect to this device, and another window stating the status of the connection attempt.

UWP WTF

The big drawback to the above method is that it only works with a UWP application. When you try running the above code in a WPF application the DevicePairingResult will always be failure. The pairing action needs to be approved via the WPF GUI windows shown above. Without that approval, the pairing result is doomed to fail. Luckily, we can get around this issue with a slight adjustment to our code. Instead of using the default DeviceInformation.Pairing.PairAsync() method, you must use DeviceInformation.Pairing.Custom.PairAsync() if you’re not working with a UWP application.

The custom pairing method allows you to intercept pairing request, send it to your own custom UI and handle the “accept” or “deny” inputs from your own GUI. For complete simplicity, I’m going to show a method that simply always passes an “accept” input back to the pairing request without generating a popup or getting any input from the user.

/// <summary>
        /// Uses the ID of a UP printer share to pair the printer to Windows
        /// </summary>
        /// <param name="PrinterID"> ID of a printer share retrieved from the Graph API</param>
        private async void Pair_UPprinter_From_ID(string PrinterID)
        {
            //prepend MCP# to the string
            string AEPid = "MCP#" + PrinterID;
            //retrieve the Deviceinformation object from its ID
            var UPPrinter = await DeviceInformation.CreateFromIdAsync(AEPid);

            //add a custom pairing method to handle accepting the request
            UPPrinter.Pairing.Custom.PairingRequested += CustomPairingRequest;
                    
            //perform the custom pairing operation
            DevicePairingResult Dpr = await UPPrinter.Pairing.Custom.PairAsync(DevicePairingKinds.ConfirmOnly,                                  DevicePairingProtectionLevel.None);

            //remove the custom pairing method
            UPPrinter.Pairing.Custom.PairingRequested -= CustomPairingRequest;

        }

//A method to handle accepting the pairing request for non-UWP apps
public void CustomPairingRequest(DeviceInformationCustomPairing sender,DevicePairingRequestedEventArgs args)
        {
            
            args.Accept();
            
        }

And that’s pretty much all there is to say about that. Given the above information, you should be able to construct an application or script in any language that can handle installing Universal Print printers on demand.

Hero to the Downtrodden: Reverse Engineering and Improving Deathspank

Part 1 – Creating a new format for *.datadict files and why

Once or twice a year, there’s a game trilogy my wife and I like to play together. It’s a little-known series called the Deathspank series. It’s a comedic take on diablo style RPG loot grind games. It was made by a studio called Hothead games who seem to make exclusively mobile games these days. Originally, playing this game was a ploy to get my wife into gaming by playing a game where I can play the healer sidekick and she gets to do the bulk of the action as the game’s protagonist, but we’ve both come to really enjoy the series because of its great potential. However, every time we play through the trilogy we end up thinking things like, “wouldn’t it be great if this was different”, or “I wish the weapons worked like this” or “I wish my inventory wasn’t so annoying to manage”. I finally decided to do something about these annoyances recently. I set out to write my own mods for the game to improve a trilogy my wife and I have come to love so much.

This post will outline my efforts to modify the individual game files contained in the game’s “.gg” formatted archive files. First, let me say, to the unpack and repack the files from the archives, I’m using a tool created by a modder named Xraptor that can be found here. I’m not a huge fan of running modding tools created by people who don’t share their source code, but I haven’t completed work on my own packer tool and I’m fairly certain the program is safe to use.

The very first goal I needed to accomplish before I could start modifying anything was to understand the data contained inside the files and their structure. The bulk of the game’s data files are contained in the GameData-000000000.gg” archive. Once unpacked, the files are located in the Build>Data folder. Unfortunately when I opened the first .datadict file I found in a notepad editor, I saw something that looked like this:

Yikes! It turns out the files contain binary data that is not easily editable inside a simple text editor. I was going to need to use a hex editor for this. Embarrassingly, I had no idea how to interpret hexadecimal at the time. I had a good grasp on binary thanks to the work I’ve done with networking and subnetting, but I had never looked into hexidecimal before this. A quick Google search gave me the information I needed, so I set out to reverse engineer the structure of the files.

File Structure

File Header

Each file is comprised of 4 sections, the beginning header block, the number of attributes per object block, the attribute description block, and the final data block where object data is stored. Lets start at the beginning. The beginning of the file contains several header fields. 4 to be exact. In all of the following examples I’m going to be using real data from the file that describes boss data. I will generally be capturing images from the hexeditor with the data organized into rows with 8 columns (bytes) because that is the easiest way to visually see the structure of this file type.

In the above image, I’ve highlighted the four header data fields. These field are each made up of 4 bytes in little endian format. The first field (first 4 bytes) serve as an identifier for the file type. The pattern 0x01,0x00,0xC7,0xD1 shows that this is a Deathspank “.datadict” file. Moving on, the second four bytes describe the number of objects that are described within the file. This file therefore describes the data for 8 objects. The third field can be thought of in several different ways. I think of this number as a representation of the length of the attribute lookup table that is found further into the file. Because each object attribute is described using a sequence of 8 bytes, the section of the file that describes the object attributes should be 1296 bytes in length (0xA2 * 8). The last field in the header block describes the length of the object data portion of the file. These file sections may be a bit confusing at the moment, but they should hopefully make sense by the end of the post.

Number of attributes per object

The next section of the file deals with how many attributes each of the 8 objects will have. Not all objects of the the same type (weapon, armor, item, boss, enemy) have the same number of attributes, so this section defines the number of attributes each object contains.

First, notice that there are 8 rows of data here. Each row corresponds to a particular in-game object. The first 4 bytes are an offset value used to locate where the object’s attribute descriptions start in the the next section of the file (the object attribute description block). The second four bytes tell you how many attributes that particular object will have. Starting at the beginning, as you might expect, the first object’s attributes start at offset 0x00 which is the very beginning of that section of the file. The second 4 byte series tells us that the object will have 0x16 ( 22) attributes. Because each attribute is always described with an 8 byte sequence, this means the first object will take up 0x16 * 8 (176) bytes. Going to the next object, it makes sense that this object’s starting offset is 0x16 * 8 (number of attributes times 8 bytes per attribute) or 176.

Object Attribute Description

Moving on, the next section of the file describes the details of each attribute. Each attribute contains the following information: 4 bytes describing the type of attribute being described like a name, damage modifier etc. I consider this the attribute description. This is followed by 3 bytes telling us where to find the in-game value for the attribute in the next section of the file (the data block). Finally, there is a single byte describing the information type for the attribute. For example an information type of 0x0D means this attribute is a string and 0x09 is a 4 byte (32 bit) integer.

In this screenshot we can see the data structure changes when we get to the attribute description portion of the file. The highlighted section represents the first object’s attributes and their properties. Notice that there are 22 lines (8 byte segments) of attribute data and the length of the attribute data is 176 bytes just as we expected from our analysis of the previous “attributes per-object” portion of the file. Also, you can see that after the 22 lines describing the first object’s attributes, the attribute identifier (the first 4 bytes) start the repeat as we move on to the second object’s attributes.

Analyzing the very first attribute for the first object in the file we can see the attribute has a title/description/identifier of 0x64,0xAB,0x5E,0x04. The next 3 bytes tell us that the data for this attribute can be found at offset 0x00 inside the data block portion of the file. The last 1 byte of the 8 byte sequence tells us what type of data we expect to find at offset 0x00 in the data block. Type 0x09 means we can expect to find a 32 bit, 4byte integer value. I’m not 100% sure what every data type signifies, but I have learned the lengths of each data type.

  • Data type 0x01 and 0x09: 4 bytes
  • Data type 0x06 and 0x0A: 8 bytes
  • Data type 0x0C: 16 bytes
  • Data type 0x0D: variable length string data. This will always be a multiple of 4 bytes in length with 0x00 bytes terminating the string. To find the length of this data I run a check for the first occurrence of a 0x00 after the starting offset of the string. I run a check to see if the string length is evenly divisible by 4. If that fails I move one byte further in the data block and repeat the check. This should always give the correct data value for the string.

The Data Block (and the root of our issues)

Finally, we’ve come the portion of the file that contains the data we want to modify. From the image above, we can find the in-game value for the first object in the file for attribute 0x38,0x47,0x58,0x86. It shows that this data should be a string and should be found at offset 0x3C (60). Moving to the data block we can see that we do indeed find a string at that location.

Using all of the pointers and offsets of the previous data, we should be able to lookup any in-game value contained within any given .datadict file. Using this knowledge, I wrote a simple program that converted the binary data into something human readable, XML.

Using this converted data I started changing values in the files to see what would happen in game. One of the first things I tried to do was to remove the arbitrary items per stack limit that is placed on consumable items like the one that summons an army of skeletons. Normally you can only hold 5 of these in your inventory at a time and there can only be 1 “stack” of them in your inventory at a time. I wanted to change this limit to 99 items per stack. In the original game, these items were really fun but they are so scarce and limited that you end up never using them and I wanted to change that. Quickly after modifying a few values for this consumable item, I noticed other in-game values were changed like weapon damage values and other random things. Going back to the data files the reason for this became very obvious.

Take a look at the image above. The first object in the list (ID 00-00-00-00) has several attributes that point to the same exact data block offset and the same data as other attributes. This means that the file employs a form of compression where it will never record the same value twice in the data block portion of the file. Instead, it will check if the value exists in the data block and if it does, it will just set the attribute data offset pointer to the existing value in the data block. This explains why multiple things were changing in the game when I was only tweaking a single value. It turned out that many objects were using the same data and when I changed it for one thing, it changed the value for all the objects that shared that value.

Fixing The Issue

At this point, the objective was perfectly clear. I needed to write a program that would read the game’s native files, remove any overlapping values in the data block so each object’s attributes can be edited individually, and update all of the offsets and pointers through the file so the game engine can still interpret the files correctly. I needed to do while keeping the native structure of the existing files. Using what I had already done to convert the files to .XML format, this wasn’t too difficult and for the most part, the files weren’t even that much bigger in size afterward.

Moving Forward

If you’ve followed along to this point you might be hoping for the source code to these programs, but I’m not ready to release them just yet (I certainly will soon ™ on github with full source code once I finish the companion app to to this work). If you understood the information in this this post, you should have everything you need to edit the files on your own and even potentially write you own file format converter. My next step is to write a simple app that lets you edit the newly created files in a convenient way. I’ve worked out what some of the attributes do but modifying the files is still a huge pain in the butt if you want to change the values for 10 different items at the same time.

Therefore my next goal is to create this new file editor application and then release both tools simultaneously so others can have fun modding Deathspank like I have. In all of my development thus far, I’ve used Azure Dev ops as my code repository because it’s private and I already use it for storing the code I write for my job and various personal projects. Please note, I’m by no means a professional programmer. I simply like to tinker with things in my spare time. I’ll be making a public github repository for these Deathspank apps so the tools are available for everyone. In my next post I’ll have a link to the code for both apps.

Long Term Goals

After making and sharing the two apps I described earlier, my long term goals are:

  • Write a new *.gg archive unpacker/re-packer that is compatible with all 3 games in the series. There is currently a tool for this but it doesn’t work for any of the DLC games files. I’ve been working on this fun project which involves breaking the archive encryption scheme. I think I have a solution for every form of encryption used in the archives. There is one for the file names and file descriptions and another form of encryption for the file data.
  • Finish a complete set of modified files a.k.a a “mod” and release it on nexus mods for others who want a different in-game experience with modified game balance, level cap, experience gains, special ability powers , sidekick abilities, character models etc .
  • Fix a game crashing glitch present in the 3rd game caused by improper enemy spawn points in Chastity Nuclear’s quest area.

Until next time, happy modding!