I recently started playing with some of the advanced calling features available in Microsoft Teams, specifically the voicemail features. For years our organization has had an on-premises Cisco based phone system. Through the use of Unified Messaging, we receive email notifications in our Outlook inbox when we miss a call and someone left us a voicemail. We can listen to the attached .wav file without having to “dial in” and check them manually. I was pleasantly surprised when I realized that Teams has its own cloud voicemail capabilities built into its calling feature. When a message is left on a missed Teams call, I get a message in both my outlook and my Teams app and I can listen to the message in either place. The service will even give you a speech to text transcription of the message.
I love the idea of having all of my important content in a single work space, so the wheels in my head started turning. I wondered if it would be possible for our Cisco unified messaging system to send me voicemails that were visible in both my outlook and my teams console. I checked a few settings on the Cisco and Teams side of things and I didn’t see an obvious solutions so I went to Microsoft support. Because we do not have a session border controller and we have not extended our calling system to the cloud, I was told, “these two systems are completely separate and as such it will not be possible to receive your Cisco voicemails in your teams console”.
My response:

I dug into the documentation for Microsoft’s cloud voicemail and how it interacts with Teams. It turns out, the Teams app is just looking at a user’s Email inbox and scanning for Emails with certain “SingleValueExtendedProperties” tags on them. Emails that match these criteria are considered cloud voicemails and will show up in your list of voicemails in Teams. With the help of a blog post: https://gsexdev.blogspot.com/2019/05/ I was able to use the Microsoft graph API to spoof a cloud voicemail email and have that message show up in both my inbox and my Teams console. Armed with a small bit of success, I knew what needed to be done. If I could make a regular old Email appear to be a cloud voicemail in the eyes of Teams, I was going to find a way to automate this process and convert all of my Cisco voicemails to Teams cloud voicemails.
Automation, APIs, and Microsoft, this sounded like a perfect excuse to use Microsoft Flow. I had a plan. If I could make a Graph API POST call create a cloud voicemail Email, I should be able to use a PATCH request to convert an existing one, so I set about designing my flow.
The first step was obvious. I wanted to make a automated flow that was triggered whenever I received an email.
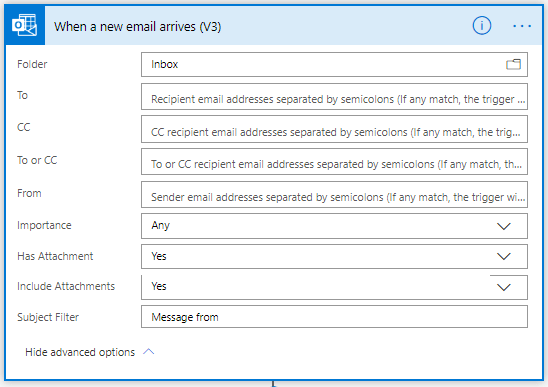
If the email matches the subject line filter of “Message from” and it has an attachment, the flow gets triggered. From there, I create four variables. First, I create “upn” and set it the value of the “To” field of the Email. This should capture my email address which is also my Userprincipalname. Second, I create “messageid” and set it the the global unique identifier propertiy of the Email that was received. We will need this value later on to convert this specific email. Next I create “Uri” using values from the last two variables that were created. This string is the URI endpoint to which we will be sending our PATCH request. Finally I create “attachmentcontent” and I do not assign it an initial value. We will set the value in the next step.

After initializing these variables that are necessary for making the PATCH request. I had one more variable to set. I wanted to know how long (in seconds) the voicemail was. Teams displays this value for each voicemail that is received and I wanted it to be accurate.

The .wav files that are generated by the Cisco voicemail system contain a length attribute, but unfortunately this value is not parsed by Microsoft Flow. The only values I could see were the unique identifier for the attachment, name, size in bytes, and file format. This meant I had to do a little calculation. Additionally, any time I tried to set a variable based on the attachment properties, it put that process inside of a ‘apply to each’ loop. I guessing that’s to account for Emails with multiple attachments. In the end, My next step looked like this:

This step took each attachment, in my case there should only be one, and it extracts the size of the attachment in bytes using the expression shown above “items(‘Apply_to_each’)?[‘size’]”. That value then gets set to the blank variable we created earlier.
Based on the recording quality of our phone system, 64kbps, I found that the following formula gave a fairly accurate estimation of the file length: (Size in bytes)/8100 = (file length). I initialized a new variable using this formula to save the file length property using a custom expression.

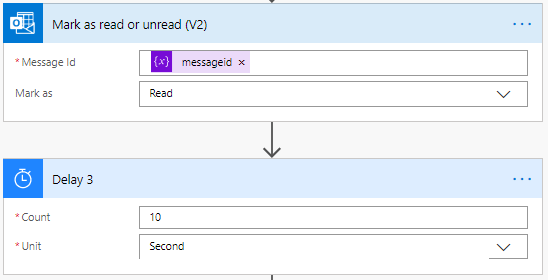
At this point, I’ve stored all of the values I need to make my idea come to life. I can start actually doing things. This first action I need to take is to mark the message as read and then wait 10 seconds. This is an important process because it makes the Cisco phone system believe the message has been listened to and it clears the little red “you have voicemails” light from my phone. I found I had to wait 10 seconds before continuing to account for latency and other factors to make sure the phone system sees the message as read. It’s important to take this step first because once the Email gets converted into a cloud voicemail Email, it breaks the relationship to the phone system and the only way to get the phone system to realize the message has been listened to is to actually dial in and listen manually.
Now comes the actual conversion process. We will use the HTTP connector in Flow to make a PATCH request using Azure OAUTH authentication. This requires an Azure application set up with the appropriate permission. You can find the setup instructions for such apps here: https://docs.microsoft.com/en-us/azure/active-directory/develop/quickstart-register-app or on a number of other blogs. For the HTTP process, we set the method to PATCH in order to modify an existing object. For the URI we use the variable we set earlier to reference the URI for the message we want to modify. I set the headers to with the value “content-type”=”application/json”.
For the body of the request, I constructed a JSON statement with an array of values for the “singleValueExtendedProperties” property of the email. These are the actual changes that will be written to the Email object. I use IPM.Note.Microsoft.Voicemail.UM.CA to set the ItemClass of the message to a voicemail. X-VoiceMessageConfidenceLevel is an undocumented property, but it is generally set to high. Next I use the wavelength variable to set the length of the voicemail message. Finally, I use the X-VoiceMessageTranscription property to set the speech to text transcription property. We currently don’t use this feature on our Cisco phone system so I set this value to a static string to let me know this is a converted Email.

Now I need to set the authentication for the HTTP process. I’ve redacted my values but you can find them all in Azure AD by selecting your app under application registrations. The secret key can be found or generated on the certificates & secrets page for your application.

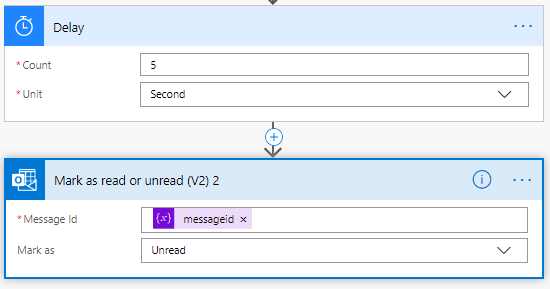
Now the message has been converted and the connection between that Email and the Cisco phone system has been severed. There are only two things left to do. First, I add a 5 second delay to let the change propagate back to the phone system, then I mark the Email as unread so I see the alert in my Teams console and Outlook.
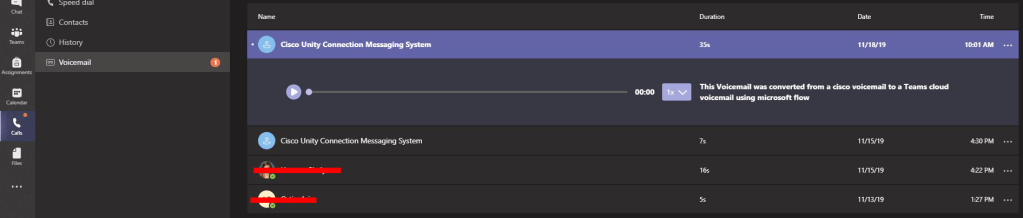
Lets take a look at the end result. I see a notification in my teams console where I can listen to the message attachment. Listening to the message in Teams marks the message as read in Outlook and visa-versa. The message duration is displayed correctly and should be accurate. If the person who left the voicemail is a member of our organization I see their user details in teams because the Cisco UM message is associated to their account and if not, I see the email came from the Cisco message system.
Let this be a lesson to you all. Don’t tell me something is impossible unless you want to end up holding my beer.
Next time we’ll go over a few improvements as well as setting up voicemail conversions for multiple users with a single Flow.
 Overkill Scripting